On Friday 29th August Canonical announced the availability of the first point release of Ubuntu 24.04 “Noble Numbat” LTS. If you’ve been running Ubuntu 22.04 LTS this means you will shortly receive a prompt to upgrade. Alternatively you can manually upgrade via Ubuntu’s software updater or via the terminal via running:
sudo do-release-upgrade
There’s a number of worthwhile changes to Ubuntu especially if you are upgrading from the previous LTS release. Not only will you receive kernel 6.8 with the latest improvements there but there are also a number of refinements in the desktop OS such as the redesigned system menu in GNOME 46, a reworked App Centre which is far better than the old one and also updates to the various tools and packages Ubuntu relies upon.
As always make sure your backups are current and tested before opting to upgrade.
Upgrade Issue on Devices Using Secure Boot?
For me however it wasn’t all that straightforward. There’s definitely a case for doing fresh installs for any desktop OS rather than upgrades. I found the following error after trying to upgrade my StarBook MK V. This was noted after the upgrade failed then I ran software updater to try again:
The shims are to do with UEFI/Secure Boot and Ubuntu’s implementation of it. For my device this was solved by running the following in the terminal and then trying the upgrade again:
sudo apt-mark hold shim-signed grub-efi-amd64-signed
This effectively gets the apt package manager to hold these packages back. From looking around I think that this perhaps has something to do with running Coreboot and upgrading through various iterations of the firmware.
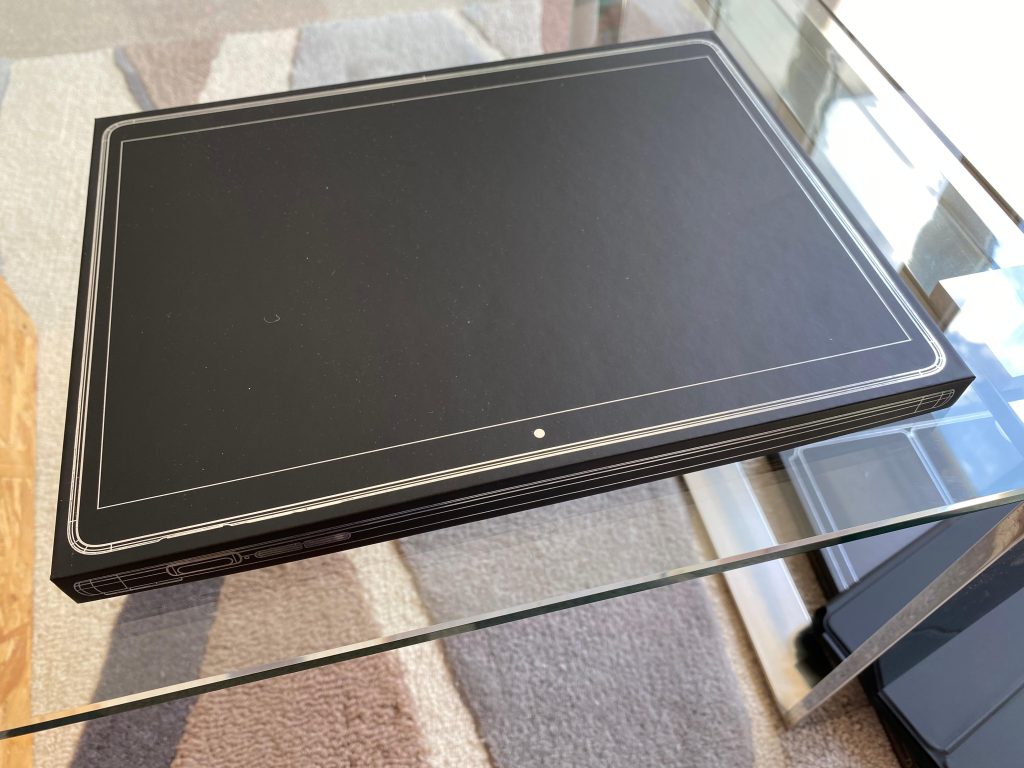
The anticipation on this one has been rising for some time. It’s finally here! After some long delays StarLabs have shipped their Starlite MK V Linux tablet. I placed an order back in August 2023 and have now taken delivery a few weeks back.
The Starlite MK V is the successor to the MK IV which was a netbook. The MK V shifts to a tablet form factor with support for optional keyboard with trackpad and pen support. Whilst the MK IV was a great PC for travel and surfing you could argue the netbook form factor is a bit dated compared to ta tablet. There’s been considerable interest in the StarLite MK V from the Linux hardware community so let’s explore further.
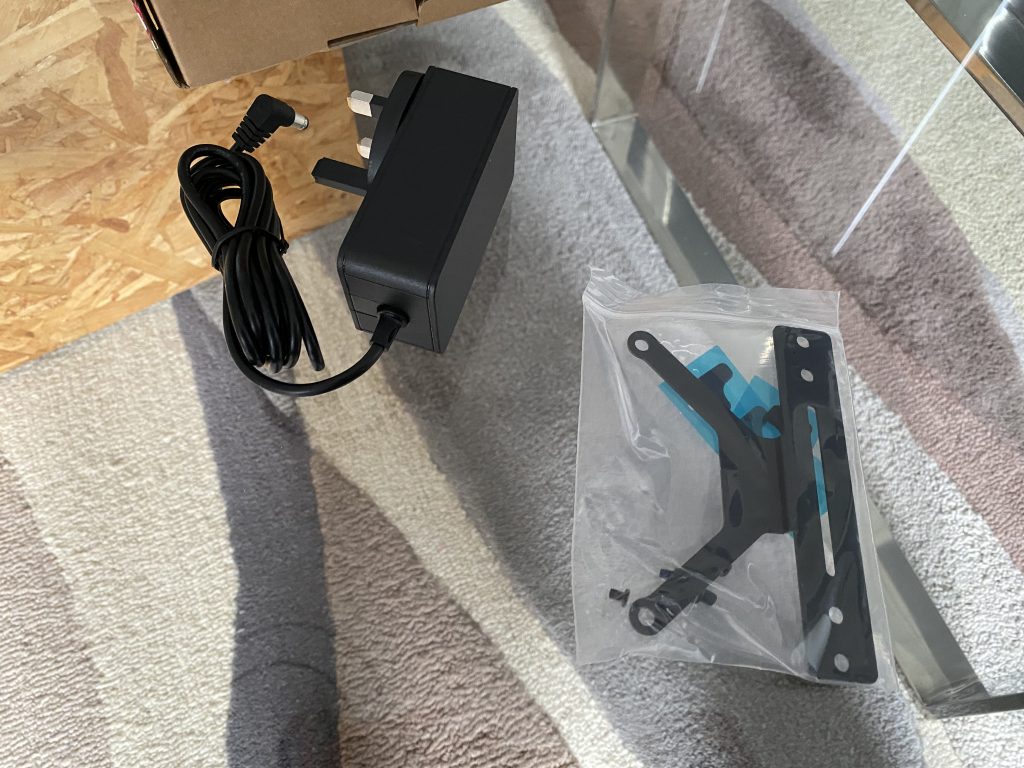
In your box you’ll find the StarLite MK V packaged as per the picture above. The charger, cables and pen will arrive in a box neatly nestled in with the rest. The keyboard also ships in a smartly designed schematics box too. The initial impressions as always with Starlabs are very good.
Specifications
12.5-inch (diagonal) LED-backlit 10-point touch display with IPS technology.
2160×1440 resolution at 208 pixels per inch at 3:2 aspect ratio.
MPP Pen Support.
1.00GHz quad-core Intel Alder Lake N200 Turbo Boost up to 3.70GHz, with 6MB Smart Cache.
I opted for the 2 TB SSD plus a UK English keyboard, the MPP active pen, and an upgrade to a 5M USB-C charge cable which came to a total of £866.67.
Note on the display: the unit I have shipped with a 3k display (2880 x 1920) however StarLabs have changed to using 2k displays as per the specifications above due to what I understand as sourcing issues.
Connectivity wise you’ll find the following ports around the tablet:
Micro HDMI (version 2.0).
2 x USB Type C 3.2 Gen 2 (up to 10 Gbps) with Power Delivery 3.0.
Supports Display Port (DP Alt Mode).
Micro SD Memory Card Reader.
3.5mm Headphone Jack.
The StarLite MKV will connect up to two displays with 3840×2160 resolution at 30Hz: up to 3840×2160 resolution at 60Hz using HDMI or up to 3840×2160 resolution at 30Hz using Display Port.
In terms of OS compatibility any recent Linux distribution will be supported. During your order you may select some StarLabs provided choices such as Ubuntu, Mint, Manjaro, MX Linux, Zorin and elementary OS. You may also opt for Windows 11 to be shipped with your device if you really want it.
The tablet shipped with Coreboot 24.05 which had a number of issues with the screen, suspend, charging amongst a few other minor points. Thankfully version 24.07 has been made available on LVFS and has provided a much smoother experience. For my review I installed Ubuntu 24.04 Noble Numbat. Unfortunately the kernel 24.04 ships with does not properly recognise the orientation of the screen. For installation I connected to an eternal display and then ran some commands provided by Starlabs to correct. As I understand later builds of kernel 6.8 should be OK however the end experience is pretty much dependent on having both that and Coreboot 24.07 in use.
First Look
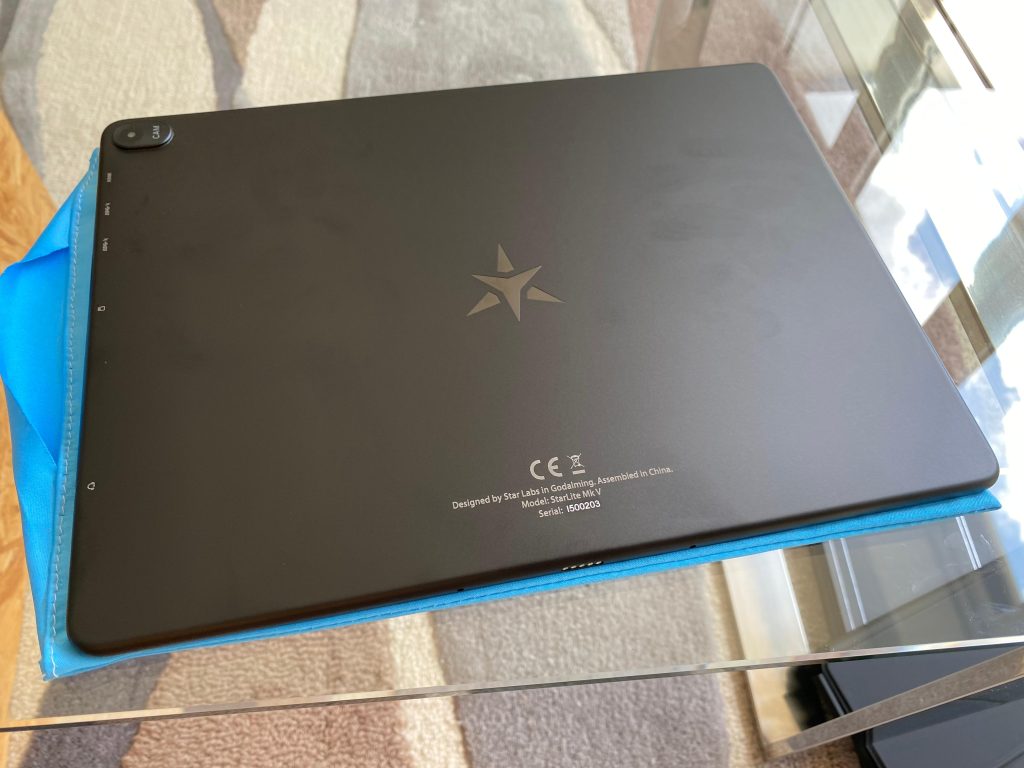
The StarLite MK V comes in a smart looking black aluminium anodised chassis with the Star:abs logo embossed into the back. With each order there is the customary blue sleeve to keep the device in. On the back there is also a 2MP camera for taking photos and recording video.
At around 0.9 Kg the StarLite MK V is heavy and unwieldy to handle. Compared to a Microsoft Surface Go 5 (Intel N200 processor for comparison) which has a mass of 521g the StarLite is on the heavier side of the device front. I have to use both hands or rest the device somewhere to use it.
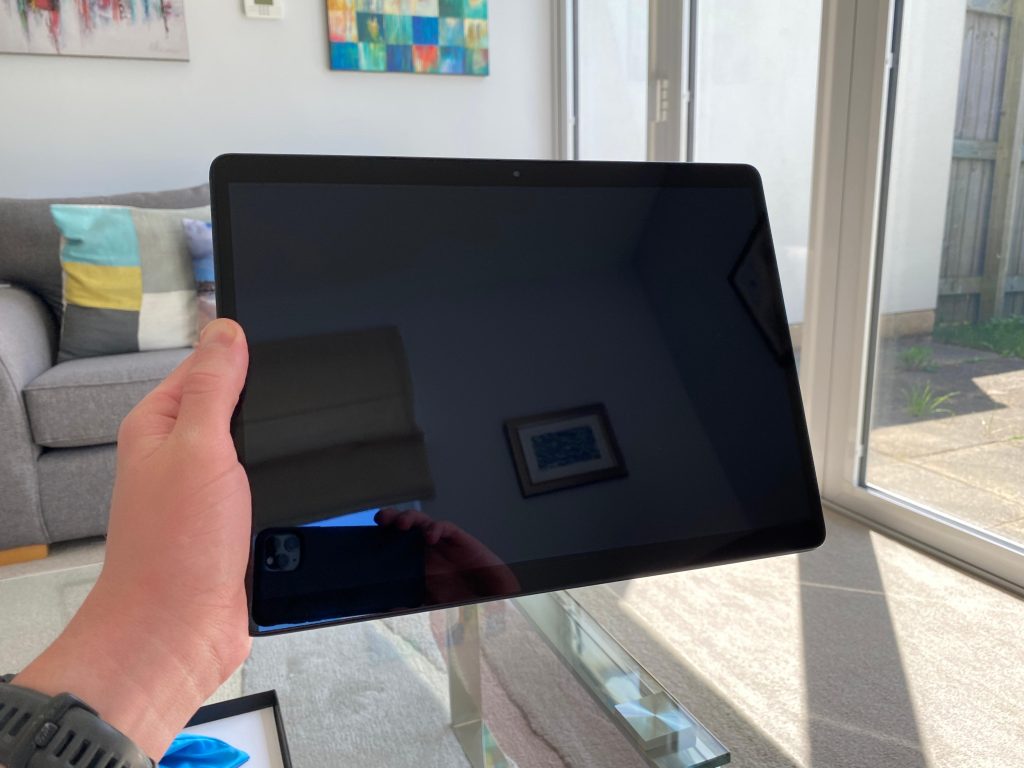
The screen itself is very bright and readable. For example reading PDF files were clear and legible, watching videos was also a fine experience with acceptable colour and brightness levels. The screen won’t be on the level on some high end laptops and tablets but for the price point I feel it’s pretty good. Unfortunately around the edge of the display there’s some hollow points underneath which can be felt when using the device but not so many it completely spoils the experience.
Performance and Battery Life
As per the specifications StarLabs quoted up to 12 hours of battery life. I wrote this review on the StarLite MK V starting at approximately 09:00 with a charge of exactly 70%. With Ubuntu set to power saver mode I lasted until approximately 11:23 until the critical notification at 5% was triggered. This was with a connection to a VPN over WiFi doing largely emailing and web browsing. In other words even with the uncharged 30% of battery accounted for it’s not anywhere near the quoted 12 hours of battery.
The Intel N200 processor is a 4 core and no hyperthreading SoC. Performance wise that should put it around 10th generation Core i3 levels. It’s more than acceptable for basic web browsing and watching videos. I didn’t notice any dropped frames watching a short film for example. Anything more strenuous than the basic tasks such as compiling software, virtualisation or gaming and you’ll not find this tablet well suited for. There is 16GB RAM available to the user which means that multitasking should be OK.
Keyboard and Pen
Whilst you may just want a tablet for web browsing, media consumption and video chatting the StarLite MK V optionally ships with a custom backlit keyboard with a multi-touch trackpad for more keyboard and mouse intensive applications such as word-processing, coding and spreadsheets. We have to unfortunately discuss the keyboard in not so great terms. I opted for the UK variant and my experiences are based as such. Languages include UK English, US English, German, Spanish, French, and Nordic.
The keyboard is not very visually appealing. It’s made from what I would guess is Polyurethane which picks up anything greasy or oily quite easily. It doesn’t have any StarLabs branding on it and also fully covers the tablet when attached. Typing on the keyboard is OK. You can’t put the keyboard at an angle sadly so it will always be flat on whatever surface you are resting upon which is a drawback for coding and word processing. Some of the keys aren’t cut properly and catch on the frame. I particularly note the space bar and the Escape key are susceptible to catching. All things considered you won’t be using this keyboard for typing intensive activities.
The trackpad surface itself is OK; it’s responsive and accurate to use for navigating the OS. Multi-touch is supported which means that if your OS or application supports gestures this is nice to have.
The keyboard connects to the tablet by the way of two little plastic prongs. These don’t actually semi-permanently clip the tablet to the keyboard so it’s quite possible that the tablet might fall out if you’re not careful! A rudimentary kickstand is achieved by folding the back cover horizontally which is pretty clever design.
Overall the keyboard stands as a disappointment. It’s probably almost a requirement having one to get a full experience from a tablet for example if you want to write out a longer email, do a spreadsheet, code or input some shell commands.
The StarLite MK V display includes support for MPP active pens. This admittedly isn’t a strong requirement for me however for completeness I wanted to try it out. The pen itself is an extra £30 with your order. Two extra nibs are included as spares. The pen itself seems reasonably accurate although me being artistically challenged I’m not able to make an authoritative judgement to that.
Final Words
It’s great to finally have hold of the StarLite MK V. If you’re reading this review I’m assuming an interest in open source and by extension Linux. If you want the StarLite MK V you really must want this tablet and be prepared to live with its limitations.
That’s where it’s hard to talk about this without acknowledging that you can find an iPad or Android tablet for less money but will also provide an app store with a full fledged selection of apps. If that’s important to you look away now.
The tablet itself maintains the usual Starlabs traditions of great packaging, smartly designed chassis and also much flexibility in terms of options to customise the tablet in terms of storage, accessories and pre-loaded OSes. The customer support has been great as always.
As alluded to battery life and the keyboard are the most noticeable drawbacks of this tablet. The battery life may be addressed in the future by improvements to Coreboot firmware and kernel updates. The keyboard however can not and despite it being an option it’s very much a requirement for situations where you need to use a hardware keyboard or trackpad for system tasks.
For Linux enthusiasts out there the StarLabs Starlite MK V is well worth a look. Should you have any questions do let me know in the comments!
It’s been some time (over)thinking, (over)planning and (over)delaying but today marks the first day of my career break.
I have been working for Lake Financial Systems for the past 8 years as a Technical Consultant specialising in Microsoft SQL Server, Microsoft Windows Server and Microsoft Azure. I have now decided it’s time to move along by taking a short career break. Thank you all to the Lake team once again and all the best for the future.
Once the decompression phase is over I’m working on transforming this site into the full functioning business I always intended it to be. As a business we’ll be offering the best of support to all kinds of organisations with your data and infrastructure requirements. I shall still be blogging and next week plan to release a review of the new StarLabs Linux tablet Starlite MKV.
Small form-factor (SFF) PCs are very much in demand in both office and home environments right now. They have a variety of use cases from a go-to device for basic internet, email and video on the desktop to use as mini-server and everything in between.
UK company Star Labs decided to replace their initial Byte mini-PC with a new version aptly called Byte Mk II. I was a fan of their StarBook MK V laptop (still in use and writing this review on it) and also the idea that they started their company in a pub. What could be more British that starting a company in a pub? After a delay with shipping finished units and delivery to customers it’s finally the day to review this new iteration of their Linux championing SFF PC.
Specifications
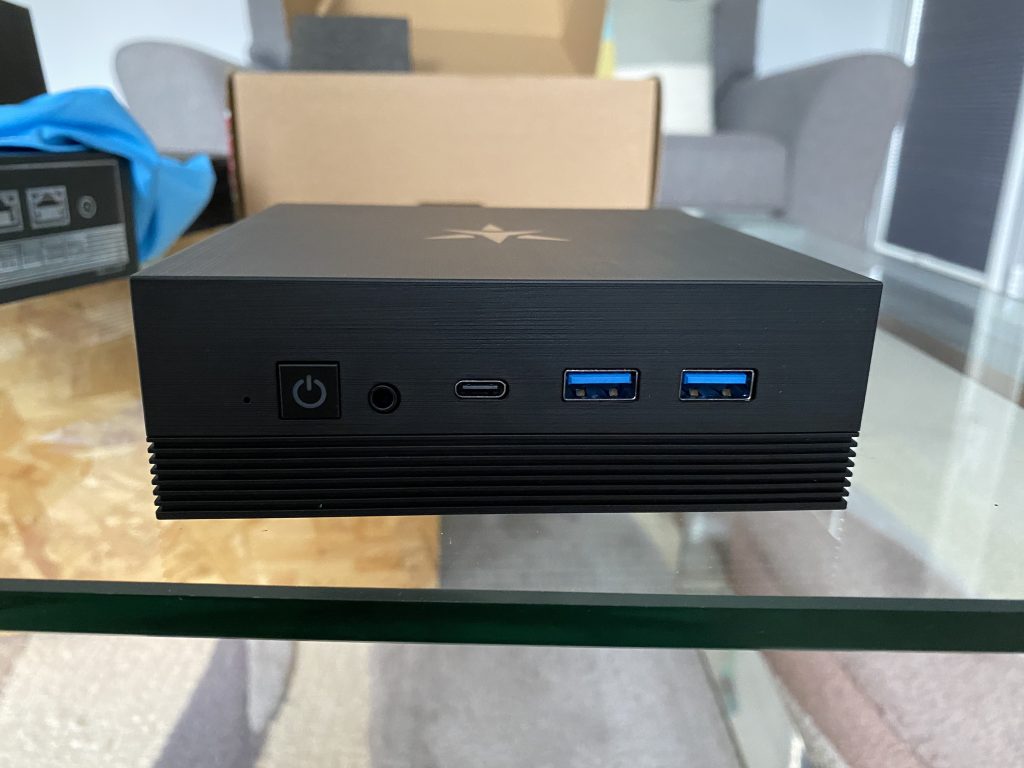
The PC itself measures a rather compact 12.7 cm x 12.7cm x 4.3cm (W x H x D) and has a mass of only 265g. The PC is fanless and is cooled by a passive heatsink so as such produces no noise.
As for internal hardware and possible configurations from Star Labs’ website expect the following:
Intel N200 SoC – 4 core @ 1.00GHz, Turbo Boost to 3.70Ghz with 6MB Smart Cache
Intel UHD Graphics at 750Mhz frequency.
1 x 8 GB / 1 x 16 GB / 1 x 32GB DDR4 3200Mhz Memory module
As noted the memory and SSD are customisable options. The base price of the system configured with 8GB memory and 512 GB SSD as of writing is £504 before discounts. For the system as reviewed I opted for 16GB memory and 2TB SSD. 32GB memory I don’t think was an option when I pre-ordered.
I also noted it’s possible to add 2.5″ SSD/HDD via what I presume is an internal connector on the motherboard. That might for example be useful if you were intending to use this PC as a NAS or for some additional storage beyond the M.2 SSD.
As usual with Star Labs when placing an order you get a choice of Operating Systems that can be pre-loaded before being sent out to you. There are several Linux distros to choose from including: Ubuntu, MX Linux, Mint, Manjaro, elementaryOS and Zorin. Notable choice is that you may have Windows 11 installed despite the fact that the Byte Mk II ships with a coreboot firmware. This surprised me as the last I heard on this was that it was a bit experiential however if that’s your thing then you’re covered. I opted for no OS to be shipped with the device as I prefer to do that myself.
In the box you’ll also find your choice of power adapter (mine was for the UK) and a VESA mounting kit so that you can attach the Byte 2.0 to the back of a monitor to keep your desk tidy. The rubber feet to cover the screws do not come pre-attached so if you want to change components before powering on you won’t damage the feet.
Connectivity
Front
Power button
3.5mm Headphone Jack
1 x USB 3.0 Type-C
2 x USB 3.0 Type-A
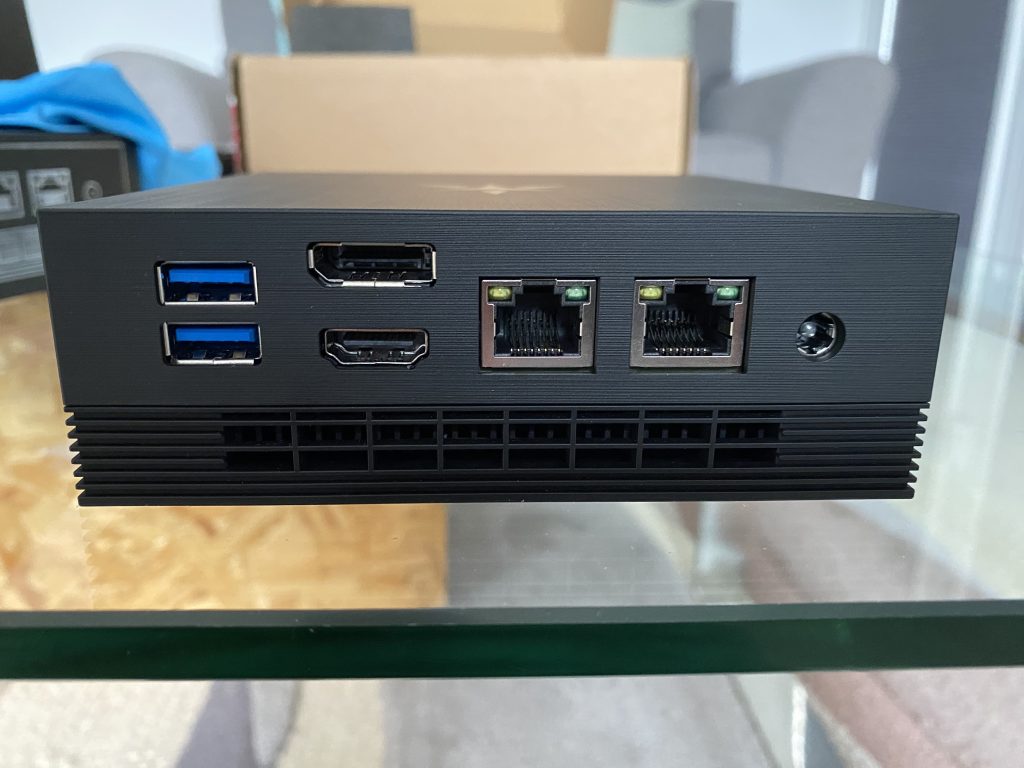
Back
2 x USB 3.0 Type-A
1 x DisplayPort
1 x HDMI
2 x Ethernet
1 x DC Power
According to the specifications the Byte 2.0 can support up to two displays with 4096×2160 resolution at 60Hz. Perfect for dual screen office work and general browser based tasks.
Power On, Coreboot and Performance
As mentioned above the Byte Mk II runs coreboot and not the usual UEFI based firmware. As of recent Star Labs have changed from using a tool within the Linux desktop to having a built in menu system accessible via repeatedly mashing F2 / Del on the keyboard. This will also let you choose the boot order for your connected devices. If you are used to configuring a UEFI or BIOS system then coreboot will be pretty similar. As mentioned above I think this system will even boot Windows if that’s really your thing but do check with Star Labs first.
Initial power-on was without any drama. As mentioned above the Byte Mk II is passively cooled so no noise could be heared at all. I attached a USB drive to the Byte Mk II’s front panel an proceeded to install Proxmox VE 8.2. the OS installer recognised the SSD and network adapters with no issues. If you use a recent version f your favourite Linux distribution you should have no problems.
I haven’t benchmarked the CPU, GPU or the SSD for the purpose of this review. Partly because that’s not directly doable on Proxmox and also because I don’t feel anyone’s going to be buying this PC for high performance requirements. Sorry!
the Intel N200 SoC was powerful enough to run Proxmox as a learning environment consisting of the base Hypervisor and 2x CLI only instances of Ubuntu 24.02. Performance was acceptable given the 4 cores and single-channel memory in use however further load I would expect to strain the system somewhat.
Final Words
The Star Labs Byte Mk II is easily a recommended low power, Linux focused SFF PC. The packaging gives the usual excellent first impression.
Worth also noting that Star Labs produces a disassembly guide to help you replace or upgrade components. I like to see importance given to serviceability so kudos for supporting the movement for self-repair.
For this PC I’ll be using it to experiment with Proxmox VE. Thanks to dual network ports you may find this device pretty useful for a low powered firewall, router or file server for example. the Intel N200 SoC may be limiting for some uses such as gaming and bulk video transcoding however as it’s a similar type used in retail NAS units you may well find this suited to a media PC too. Of course the Byte Mk II would also server great as a home office PC sat behind your monitor.
These past few weeks I’ve been working on health checking a client’s SQL Server 2017 instance that hosts databases for their finance and spend-control applications. In my suite of tests there were over 70 different points checked across SQL Server and the applications to ensure that they were operating at peak potential.
Three useful things you can do to quick check a SQL Server instance even if you don’t have a DBA or SQL management skills yourself:
1. Check the installed Cumulative Update (CU)
SQL Server itself is a highly tested product and usually you’d not expect to have any serious issues in production. From time to time though there are security, performance and functional updates released for the product. It’s recommended to frequently apply the latest Cumulative Update or “CU”. These are highly tested updates that are certified to the same level as what a service pack used to be.
You can check the currently installed CU via installed updates in add/remove programs, by comparing the version string in the properties of the SQL Server instance in SQL Server Management Studio (SSMS) or referring to documentation your SQL Server installation consultant gave to you.
If your instance of SQL Server is no longer supported then it’s time to plan out an upgrade.
2. Check the free disk space
SQL data files, log files and backups can grow to consume a lot of space. These files are necessary for a full functioning SQL Server instance. It’s therefore necessary to manage the disks they are stored on.
If SQL Server runs out of space it will follow the database settings for Autogrowth if switched on. If there’s no data to allow the growth to occur then SQL Server will return an error instead which the end user will then somehow experience (error message, timeout, nothing happening).
As for backups that’s a lot more straightforward; no disk free then no backup.
Simply check these by looking at free disk space in File Explorer and then consider expanding the disks, moving files about or planning a migration to a server with more storage. Another important note that you should avoid shrinking production databases. Yes, it’s best to allow disk space to be pre-allocated to SQL Server databases! This avoids fragmentation which can reduce performance and also delays in response due to the database engine awaiting the disk to allocate more space.
3. Checking over the host Operating System.
Your SQL Server will only ever be as good as the operating system it’s hosted upon. You should periodically check that the latest updates are applied to the OS, ensure that there are no major events that need attention logged in Windows Event viewer and also ensure that CPU and memory aren’t under pressure from other applications.
This by all means isn’t a comprehensive list of things you should be checking on a SQL Server but it’s relatively easy to do for someone who has sysadmin skills for Windows Server (or even Linux).
If you have performance, security or operational issues with SQL Server don’t hesitate to get in touch with us at Digital Incite and Matter Ltd. We are experts in maintaining mission critical SQL Server instances for organisations of all shapes and sizes.
A TV programme is not usually the subject of this blog. What is occasionally the subject of this blog is the application of IT and the real human impact it has. People like me got into IT with a view to the betterment of society. I am not a TV watcher myself but after being asked many times about the Mr Bates vs The Post Office I decided that I would take the time watch it to understand the content of it.
The programme rightly focuses on the human impact of the scandal. Whilst the technical explanations for Horizon’s failings are not explained in great detail there are some points pertinent to the IT industry.
The Software Is Robust?
This claim is made by the then head of the post Office Paula Vennells in a phone conversation. This is a problematic claim to make; all software has the potential to contain bugs. As above the programme does not go into great depths regarding the technical aspects of the Horizon IT system but issues with multiple POS terminals and a PIN pad are raised.
The IT industry should always assume room for error within a system and the processes by which people use it. Concerns and patterns of issues should have been picked up by both Fujitsu and the Post Office long before this became a national scandal.
Remote Access?
There one particular theme running throughout the programme which is of remote access to systems. Remote access is a normal part of supporting modern IT systems however in the case of the Post Office, Fujitsu and Horizon things went badly wrong.
It is explained in the programme that Fujitsu employees made remote connections to Post Office branch systems and made “corrections” without the knowledge of the sub-postmasters. Under no circumstances should remote access be made to a system be made without consent. The results of the remote access session should be recorded and any corrective action made to a ledger should be made under an administrative or support account so that the action is not logged as the user reporting the fault instead.
It is inevitable that as a result of the programme that the idea of remote access to systems will be challenged more however given the trade off between rapid support and information confidentiality, accuracy and legitimacy I would expect we are in a fully “remote accessible” world.
Non-disclosure Agreements?
The use of Non-disclosure Agreements (NDAs) are brought up at several times in the programme. In the case of the Horizon system they were used by the Post Office to prevent victims of the scandal from discussing their settlements with sub-postmasters. The ethics of NDAs continue to be an issue for the industry. Whistleblowers should always be empowered and protected by law to ensure that they are able to raise issues to their employer or the authorities.
Lack of Training & Support
In the programme one of the victims Jo Hamilton states that she is no confident with either technology or accountancy. There is another lady later on in the series who joins the JFSA group and reports issues with the Horizon system reporting losses when the power is repeatedly going out at her branch.
In the case of both of these victims this highlights the lack of support given to the sub-postmasters for using the system which is supposed to help them run a Post Office. There is also a constant theme raised in the programme over helpline staff telling victims that “they are the only ones having this problem”.
I have often thought that by labelling someone a “user” outside of a design context is problematic. We often use words in IT that dehumanise. In the case of the Horizon scandal this also underlines why effective training and support should always be available to people using the systems.
The Future?
The themes discussed in Mr Bates vs The Post Office should be a wake-up call to anyone in the IT industry – regardless of their job description – that cover-ups and complacency with the truth has real human impact. Sub-postmasters have been wrongly convicted as criminals based on faulty evidence of fraudulent accounting and theft. As a result livelihoods have been lost, and some have tragically taken their own lives as a result. It is only the right thing to do that these people should be compensated.
For further reading I recommend Computer Weekly’s Everything you need to know article. As a publication they first investigated the story after receiving letters from Mr Bates and other sub-postmasters. They have done great work tracking the story for a considerable amount of time.
There is a character in the programme Robert Rutherford – I understand to be a compound character of two Second Sight forensic accountants – who when interviewing Jo Hamilton tells her in response to her asking: “can I ask a stupid question?” responds with “There are no stupid questions, only stupid answers”. Damn right.
A bit of a segue from the usual SQL Server posts this week but I wanted to share a recent challenge I encountered with a VMware ESXi host. I needed to to ensure that all high CVSS vulnerabilities were resolved for upcoming Cyber Essentials compliance. This necessitated an upgrade of a VMware ESXi host as a first step as the version in use had known vulnerabilities.
Post upgrade of the ESXi host what I found however was that this did not fully resolve the security concerns. Our Microsoft Defender for Endpoint dashboard picked up that all the servers on the host were still using a vulnerable version of the VMware tools. Upon further investigation despite that the tools had upgraded to a higher version included with the ESXi release there were still unresolved issues with that particular version. It would be necessary to upgrade to a even more recent version of VMware Tools from VMware’s downloads site to fully resolve the vulnerability findings.
You most certainly could manually logon to each server and perform the tools upgrade manually however if your ESXi host has as many servers as ours then the process to upgrade each one might take some time and cause service disruption. After all this is IT and we pursue the noble art of automation in all areas right?
I have to apologise for the lack of screenshots in this post as this was done on a server I’m not privileged to take screenshots of but hopefully you can make sense of the steps below. Comment below for any clarifications required.
Ensure compatibility of the updated VMware tools using the VMware Compatibility Guide and then test on an isolated server – you don’t want to risk potential downtime by installing a version of VMware tools that has a compatibility problem.
Enable SSH access to the VMware Server – to do this open the Host tab in the ESXi web front-end then go to actions > services > Enable Secure Shell (SSH).
Logon to the ESXI host using an SCP tool such as WinSCP – once in navigate all the way to /vmimages/tools-isoimages. You’ll notice that this contains ISO images and manifests for Windows and Linux versions of the VMware tools. Note that his folder actually is a symlink to a folder at /vmfs/volumes/<GUID>/packages/<version>/vmtools.
Backup the contents of the folder – just in case y’know.
Get a copy of the VMware Tools and upload into /vminmages/tools-isoimages. Make sure you overwrite what’s in the folder and include all the files from the download.
Disable SSH access by repeating step #2 – reducing the ESXi host’s attack surface area is always a good idea.
Shortly after completing the above process the ESXi host will automatically pickup that there’s been a change in the VMware Tools in the store. You can from that point upgrade using one of the following methods:
Right click the VM > Guest OS > Install/Upgrade VMware Tools…
If the option to automatically upgrade tools is selected for a VM then reboot and it will handle things itself.
You should at this point have VMs running the latest VMware Tools which you can check the version in the list of hosts. You can add in the column for the VMware Tools version to check all VMs without logging onto each one.
If you’re reading this I’ve temporarily closed off SQL Server Management Studio for the year and I’m spending time with my family & friends.
I hope you are having a wonderful Christmas too and that Santa brought you all the things in the world you wished for or at least everything Santa could do with the SQL login privileges he had at the time.
Thank you for reading the blog and I look forward to writing more content into 2024.
This will be the final semi-regular post of the year so before I get into the subject I’d like to say a brief thanks for your readership over the year!
This week I have been focused more on the platform side of things: organising updates on our VMWare ESXi host with our data centre and preparing for an upcoming attempt at Cyber Essentials certification. In other words not that much on SQL Server this week but still had a dabble when called for.
It has come to my attention that you can’t licence SQL Server 2016 or 2017 through distributors any more. You’ll have to pardon my ignorance on licensing as through my main job we don’t do the SQL Server licensing. Either there’s already an SQL Server there or a new one is deployed.
I recently did a rapid-fire upgrade for a client which called for a move of an existing application from Windows Server 2012 R2 and SQL Server 2012 infrastructure. Because of the age of the application running there which wasn’t to be upgraded the design called for Windows Server 2016 and SQL Server 2016 to be used as these were the highest supported. Unfortunately the client’s IT were not able to source SQL Server 2016 from their distributors any more.
This is a nice segue into SQL Server compatibility levels, what they are and what they are used for and how that could save us.
Every database connected to a SQL Server instance has a compatibility level set. By default for a new database it will be the compatibility level for that particular version of SQL Server that’s been installed (unless the instance has been upgraded but that’s a different matter). The database compatibility level is used by the Database Engine to control what specific SQL Server behaviours and changes are used for that database. If you want to know more then Microsoft have that in their documentation if you fancy a detour.
The official word from Microsoft is that you certify an application against the database compatibility level and not the SQL Server instance version. In other words it’s valid to have a SQL Server 2022 (160) instance and connect databases with a SQL Server 2014 (120) database to it with a corresponding compatibility level to maintain backwards compatibility. Your application vendor might begrudgingly disagree with that policy though so check in with them first.
Examining and Changing the Database Compatibility Level
In SQL Server Management Studio the easiest way to determine the database compatibility level is by right clicking your target database > properties > Options tab. The current compatibility level is displayed in the window.
SELECT [name],[compatibility_level]
FROM sys.databases
You’ll notice that the compatibility level is not 2022, 2019, 2017 etc but a number corresponding to the product version of the SQL Server instead.
If you determine that a compatibility level change is required you can set a new level using the following command:
ALTER DATABASE [MyDatabase]
SET COMPATIBILITY_LEVEL = 160 | 150 | 140 | 130 | 120 | etc
You should note that you may experience query regressions when moving up compatibility levels. The usual reminder to test carefully before deploying to production counts here!
The challenge this week concerns constraints. In an SQL database constraints are used to enforce referential integrity on the data held within it. For example you can use foreign keys to ensure that a sales order in a database always has a reference to a valid customer ID in a customers table or use a table constraint to enforce that a purchase order number must be entered (i.e.: does not have a NULL value).
One thing you can do with a SQL database which is a bit naughty is disable the checking of the data on a constraint. Useful if you need to rework some underlying data in a pinch. Hold that. It’s not. What that does is store the problem up for later and probably for someone else to work out.
Constraints and foreign keys are there for a good reason which is to make sure your data is…you know…referential.
We have a software product that – when moved up to the cloud – now requires that referential constraints are enforced. As part of the upgrade procedure with the “designer” edition of the software (the environment that the data has to be upgraded to before getting shipped off to the cloud in this case) the consultant needs to enable an option in the software which effectively builds a SQL statement to do it across the database.
Sadly when that was enabled all hell broke loose. Well. Many foreign key violations at least. the software itself did not report any issues enabling trusted constraints but another tool which checks the database for correct preparation did.
After some SQL Profiler tracing I found 5 instances where data had escaped the foreign key constraint that was written. This happens usually when someone disables the constraint using the NOCHECK option, changes the data as they see and then re-enable the constraint with the CHECK option.
When you find a constraint violation within a SQL database you can query the problematic data by using the following command.
DBCC CHECKCONSTRAINTS (<constraint_name>)
To check every constraint on the database – either enabled or disabled – use the following but be aware that this may take some time.
DBCC CHECKCONSTRAINTS WITH ALL_CONSTRAINTS
Once I then identified and resolved all the data issues I was then able to take the easy route and have the software enable all the constraints within the database and pass the upgrade check.