An IT professional specialising in Microsoft SQL Server, Windows Server, and Azure based in West Yorkshire, United Kingdom. Extensive background delivering business solutions for SME clients. Open water swimming enthusiast and facilitator for Andy's Man Club.
Hopefully by now you’re getting ready to celebrate Christmas with your friends and family instead of concentrating on that next IT project. Surely the latter can wait!
Digital Incite and Matter Ltd would like to wish everyone a merry Christmas and a happy new year for 2026. May the new year bring you peace, prosperity, and certainly good uptime on those business systems you have.
However, if you do need specialist SQL Server, Windows Applications, Linux environment or other specialist IT support over the holidays please feel free to contact us. We’re closed Christmas Day, Boxing Day, and New Year’s Day but we remain free for assistance should you need us.
Last week at Ignite, Microsoft announced the general availability of SQL Server 2025. This release is now available through licensing channels as well as for testing & evaluation purposes. Needless to say, as SQL Server Consultants ourselves, we’re very excited to see this on GA and get to work with clients implementing the latest features & improvements.
Also, a new logo for the 2025 release.
We’ve touched on what to expect in SQL Server 2025 in a previous post. Just to recap though the newest edition has a heavy focus on AI workloads. Not only is SQL Server 2025 ready to accept data formats ready for training AI LLMs but SQL Server Management Studio 22 now has Copilot built in ready to assist with writing SQL queries.
Of note with this release are a number of performance and reliability improvements in the database engine with optimised locking, tempDB space resource governance, and parameter plan optimisation. These should help improve instance performance and ensure day to day query response maintains consistency. Other improvements include SQL Server tooling for developers and enhanced support for Linux OSes.
Some licence changes for the standard edition are of particular note. Not only has the upper CPU and memory limit been raised but PowerBI Report Server and Resource Governor are now included with the licence. For Express edition there is also an uplift to 50GB of maximum database size. Express is useful to have around for a settings database for an application and lifting the limit means that it’s less of a concern that it will stop working after the limit is reached.
We’ve been hard at work building up some fresh test VMs incorporating the latest Windows Server 2025 plus SQL Server 2025 to ensure that we’re fully familiar with the latest versions of Microsoft’s Data Platform.
In terms of your organisation extended support for SQL Server 2017 will end in 2027. Whilst that might not be this coming year it always pays off to have future projects planned in advance.
Digital Incite and Matter Ltd are ready to help you with your upcoming application upgrades, SQL Server upgrades, query optimisation, and troubleshooting. Book your free 15 minute consultation call today and let’s get started.
If you’re reading this article on Tuesday, October 14th 2025 on a Windows 10 device it’s already too late: extended support for Windows 10 has ended.
Various sources suggest that there’s a considerable number of you out there still using Windows 10. There has been some controversy over the statistics recently with a notable website even claiming Windows 7 was making a comeback however we’re pretty confident that’s not the case.
With a statistically meaningful number of devices still running Windows 10 there are two key considerations from October 14th. Number one will be that there’s a significant volume of otherwise well running devices to enter an “end of cycle”. That at best will be recycling but likely will be significant amounts of landfill. That’s far from acceptable given the strain it’s going to place on the planet. Number two is that any devices remaining in service will become security problems to watch out for. We don’t like fear mongering however it’s well possible that malicious people out there will be looking to exploit the situation as best they can.
It’s our opinion that this situation is totally unnecessary and that Microsoft really should be extending the end of extended service for everyone. Previously to Windows 10 every device would have got roughly 10 years of security updates even towards the end of the OS lifecycle. Thanks to how this situation has been managed and also due to the requirements of Windows 11 there are some devices out there that have fallen short of that. As we’ve been accustomed to Windows as a service we’d like to see support to be extended to the point where Windows 10 is no longer a statistically significant Operating System in the market, however long that may be.
However, here we are.
We’ve previously mentioned how Extended Support Updates (or ESUs) can be acquired to extend the deadline even further. For home users it’s possible to get onto this for one year for free. Business users aren’t so fortunate and would need to contact their reseller for details on how to purchase the licenses.
Just to be clear your Windows 10 device doesn’t stop functioning on the 14th of October. What happens is that those outside the ESU program won’t receive further security updates to the OS. That’s a critical problem for organisations.
A secondary consideration will be how other software authors deal with the end of extended support. They may choose to stop certifying new releases of your ERP, finance or other line-of-business tool for Windows 10. Future major versions are highly unlikely to be given support.
From here on in things are with Windows 11 or perhaps other operating system choices such as MacOS or Linux. Whatever that choice may be don’t leave things to chance especially if the deadline has suddenly caught up on your IT team.
At Digital Incite and Matter Ltd we have a range of skills that can be put to the task of helping your organisation move away from Windows 10 and onto something more secure even if that’s not going to be Windows 11. Why don’t you contact us today for further information on the services we can offer?
The public preview of SQL Server 2025 has been around for a few months now. We’ve had a opportunity to test the new version of Microsoft’s well-renowned relational database system. We’ve especially been testing this with Windows Server 2025 as we foresee this combination to be a popular choice.
We expect an RTM release of SQL Server 2025 later in the year. The key question for IT management will be should we upgrade to SQL Server (and Windows Server) 2025 soon?
You might be thinking that surely as SQL Server 2025 is in preview this isn’t the time to be planning upgrade projects but read on to learn why it’s time to start planning now.
The good news is that your existing SQL Server deployments aren’t going to suddenly stop working. In particular if you’ve already deployed SQL Server 2022 those installations will enjoy mainstream support into 2028 with extended support all the way until 2033. The bad news is that some versions of SQL Server are approaching end of life. Your organisation may be preparing for the end of Windows 10 support but making plans to protect your valuable data also needs to be at the top of your to-do list.
Those running SQL Server 2017 however should absolutely start planning now. Whilst SQL Server 2017 was a great upgrade that brought performance improvements and Linux support it will sadly exit extended support in October 2027. Sounds like a long time away doesn’t it? Don’t make the mistake of putting off that upgrade. Projects to upgrade an SQL Server instance may morph into further requirements such as application patching & upgrades as well as database migrations & reworks.
In addition should you be running SQL Server 2019 you need to also note that mainstream support ended February 2025. Whilst this means SQL Server 2019 will still receive critical updates for security there will no longer be regular updates published for this version. You have until January 2030 when SQL Server exists extended support before you really need to make a move.
Whatever stage your organisation is with SQL Server we are here to help. Digital Incite and Matter Ltd are certified SQL Server consultants that can help with patching, planning upgrades or even preparing fresh deployments. Please contact us today to discuss your requirements.
I’ve previously written about SQL Server Profiler and its use in diagnosing problematic T-SQL queries, stored procedures, and application behaviours. Although the SQL Server Profiler is very much the trusted tool for doing so it’s actually marked as deprecated by Microsoft. This unfortunately means that it will be removed in a future version of SQL Server.
In place of Profiler there is another feature called Extended Events (also referred to as XEvents or XEs). As Microsoft’s intended replacement for the Profiler it’s important to learn how this feature works in anticipation for a future release of SQL Server where Profiler is no longer available.
A key advantage of Extended Events is that they are less performance intensive than what SQL Server Profiler is and that they are designed to be left running to collect data. You’ll also notice that Extended Event sessions are all done directly in SSMS rather than launching a separate tool. As sessions are stored as objects within the SQL Server instance other DBAs can also make use of them.
Let’s work through a simple Extended Event session that will capture SQL queries being made in an AdventureWorks2022 test database.
Note: the following example was done on SQL Server 2022 CU17 running on Windows Server 2022 update 2025-01. SQL Server Management Studio 20.2 was used
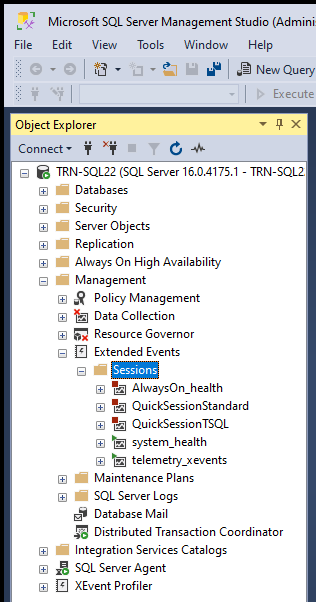
Step 1: Launch SSMS from the start menu, login to the required SQL Server instance. Once you are logged in goto Instance Name > Management > Extended Events
Step 2: Create a session by right clicking the Sessions folder and clicking New Session Wizard.
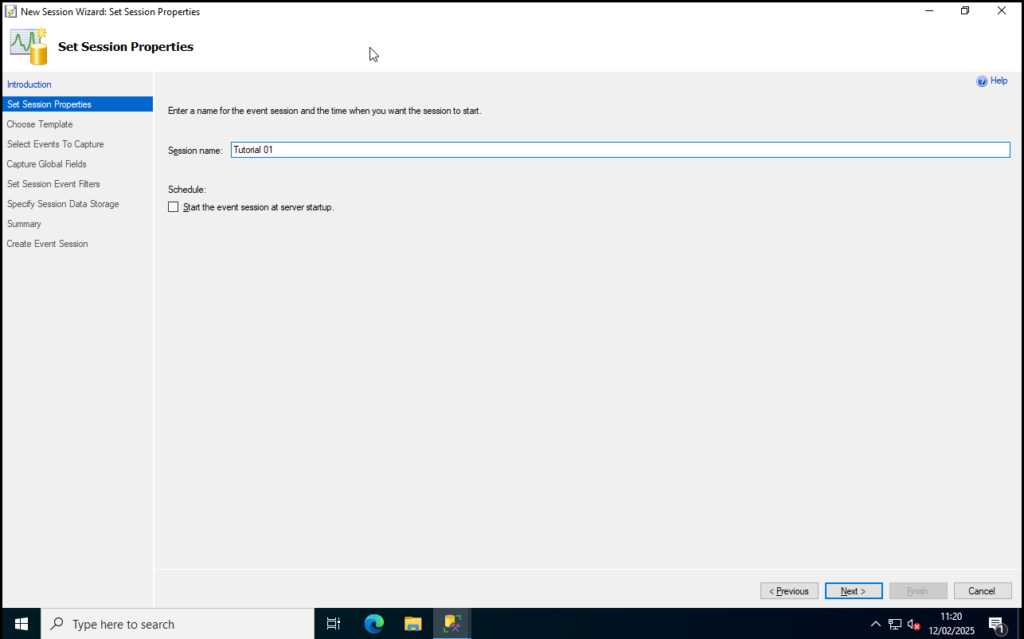
Step 3: Click Next to skip past the introduction.
Step 4: Give your XEvent Session a descriptive name. For this example I’ve just used Tutorial 01.Click Next to proceed.
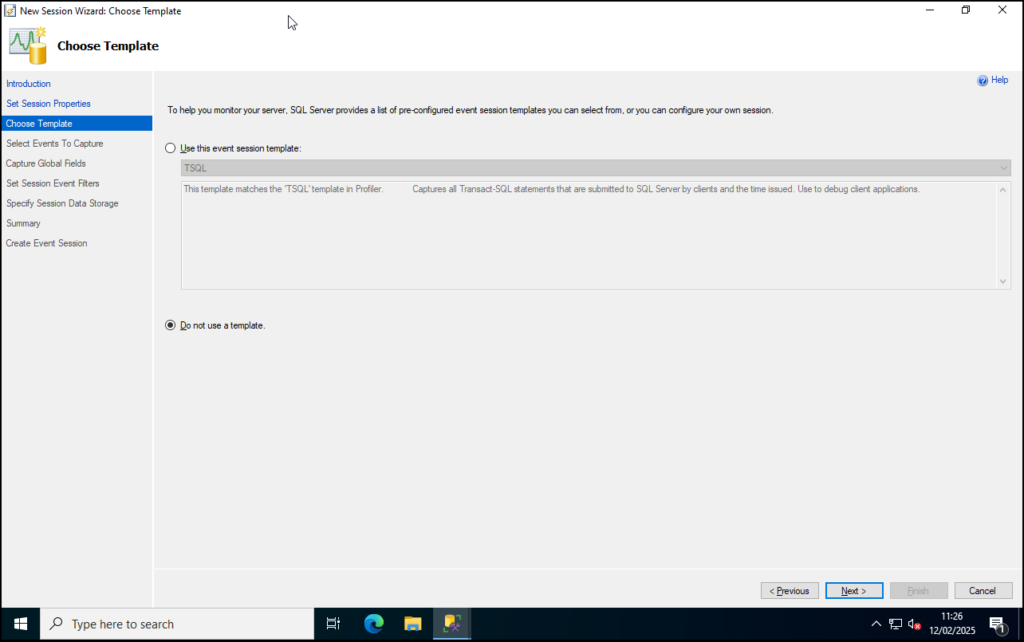
Step 5: Although there are some templates to choose from select Do not use a template and click Next.
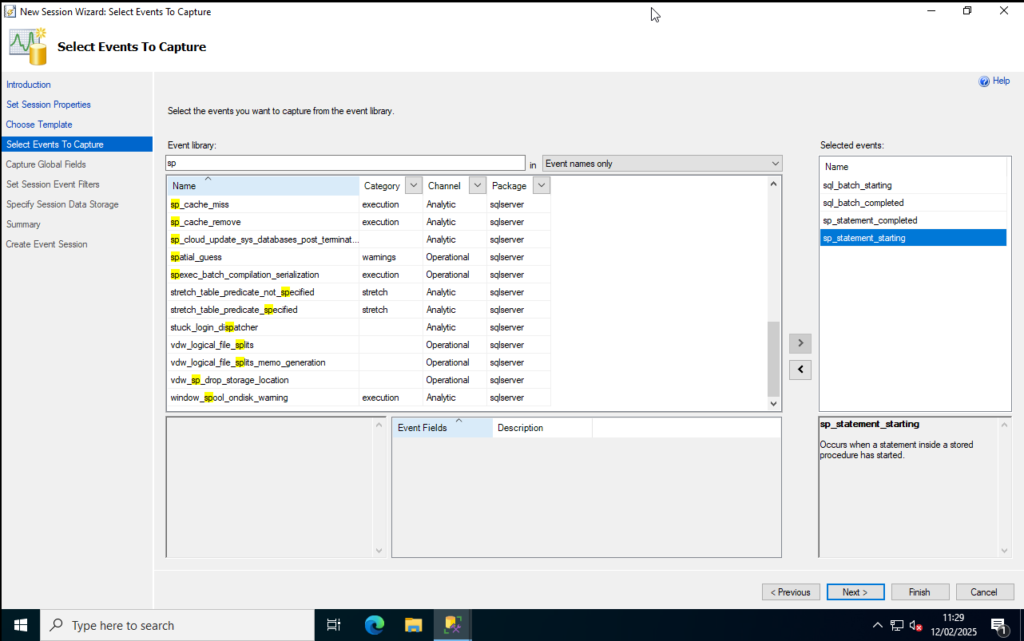
Step 6: This page now allows you to select events you want to track. Search for the following events and then double click each line to add to the list to the right. Click Next once you have them all:
sql_batch_starting
sql_batch_completed
sp_statement_starting
sp_statement_completed
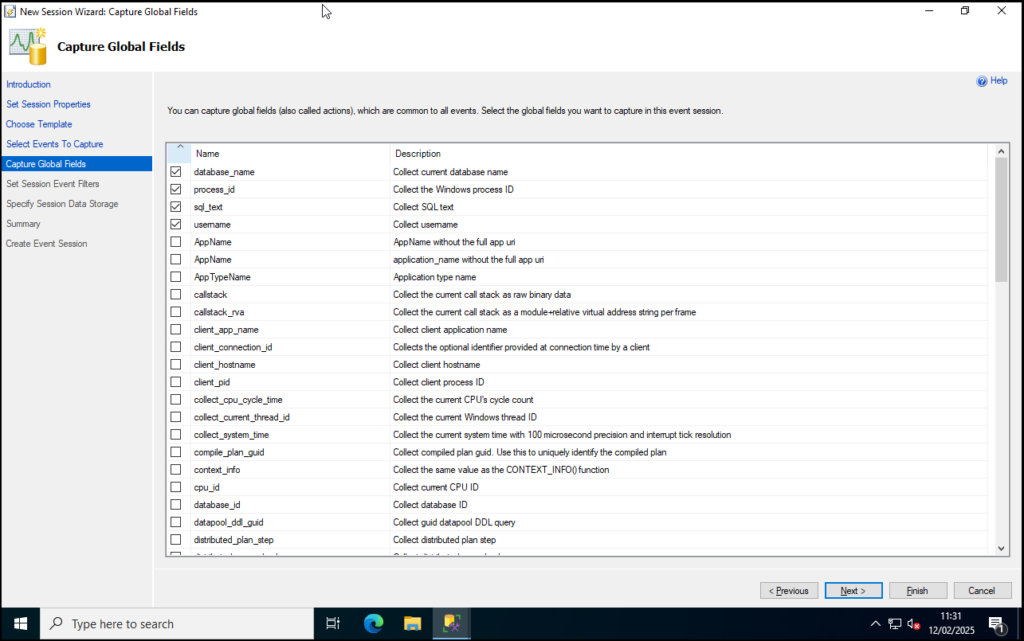
Step 7: In the list of global events to track let’s select the following and then click Next:
database_name
process_id
sql_text
username
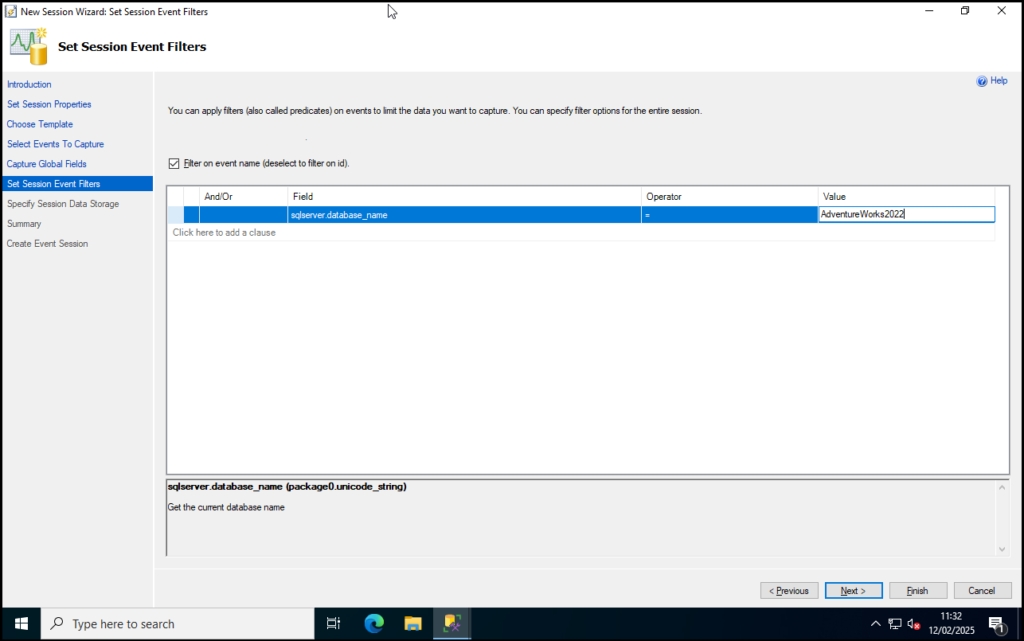
Step 8: For filters I’m going to add in a line to narrow down the XEvent to AdventureWorks2022 using the filter sqlserver.database_name. Click Next once set:
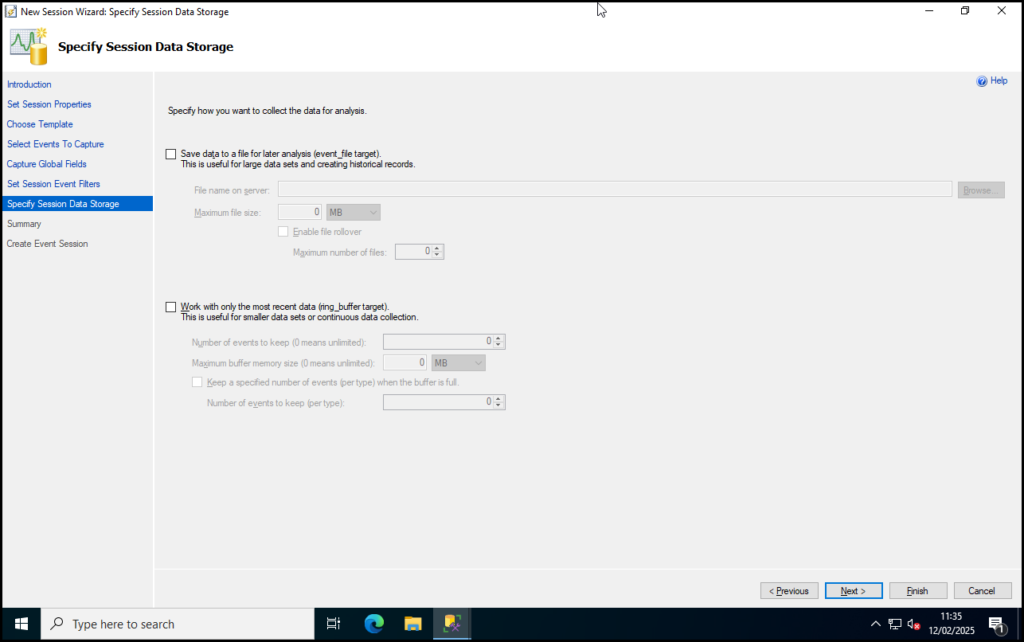
Step 9: Leave the data storage options unchecked for now. We’re only going to demo this XEvent so we aren’t interested in keeping the data. Click Next.
Step 10: Review the summary and click Finish when you are satisfied with your selections.
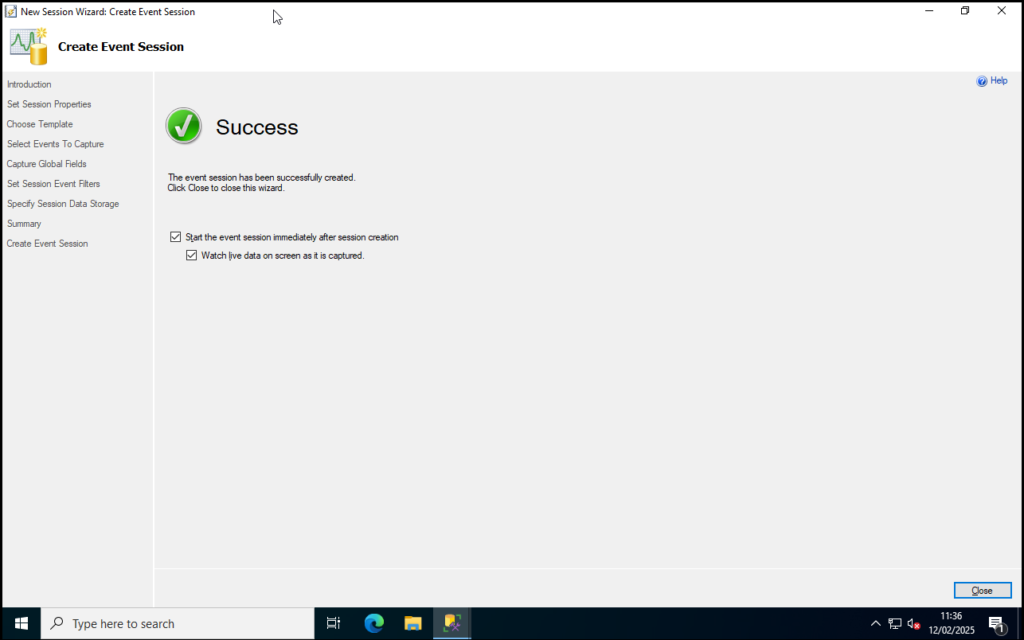
Step 11: As we’d like to make use of this XEvent straight away check both options on the Summary screen then click Close.
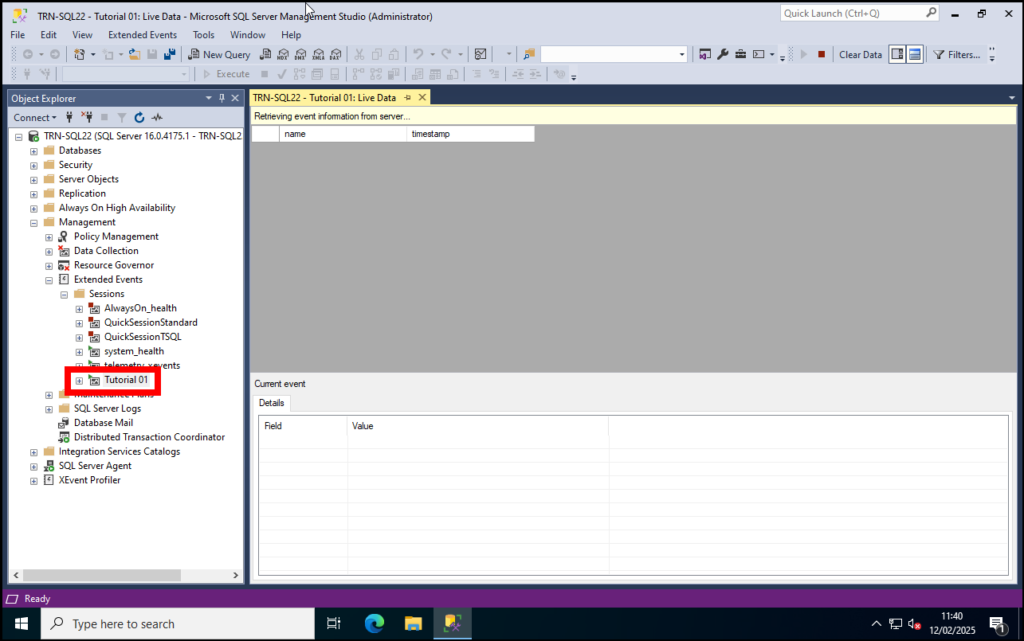
You will then go back into SSMS. Note that the event Tutorial 01 now appears under Instance Name > Management > Extended Events > Sessions in the object explorer and also that a new window for the session events is open.
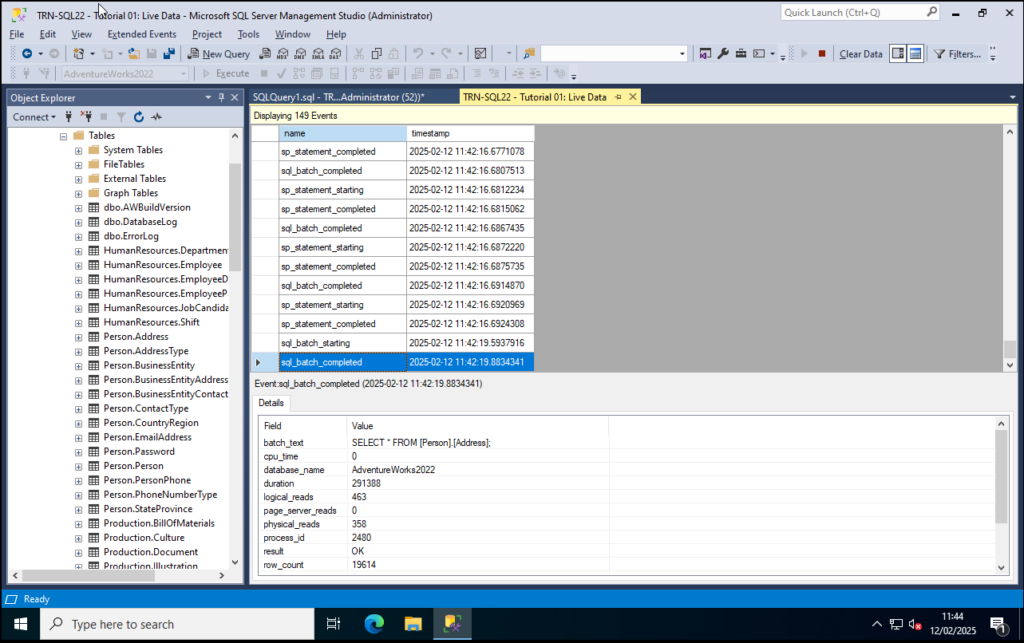
At this point make a simple select query on AdventureWorks2022. I did a lazy one just for demo:
SELECT * FROM [Person].[Address]
You’ll now see events tracking in the session event window:
What you’ve just done is a simple session event trace but you can use the steps above to further customise your XEvent to capture the information you require.
Conclusion
We’ve discussed what SQL Server Extended Events are, what the advantages are, and performed a tutorial to build a very basic XEvent on a demo database.
If you organisation needs assistance with SQL Server we are here to help. Digital Incite and Matter Ltd’s consultants are SQL Server trained, certified and experienced with a wide variety of business applications. Get in touch with us today to discuss your requirements.
Azure Data Studio was a development environment based on the Electron framework. It was particularly useful for working with SQL Server on Mac OS and Linux systems that SQL Server Management Studio is not available for. It featured an extensions system and connectivity to a number of different database systems. It was included with SQL Server Management Studio (although I found that it was frequently installed and forgotten about).
ADS will remain supported until February 28, 2026 giving time for developers and Mac/Linux DBAs time to transition. With ADS no longer under active development what other Microsoft tools can you use to develop for/on and manage SQL Server instances?
SQL Server Management Studio(SSMS)
The “go-to” tool for SQL Server DBAs and in many cases developers too. The most complete functionality can be found in SSMS such as managing SQL Server Agent jobs which can not be done natively in ADS or VS Code. SSMS is Windows only and does not run on Mac OS or Linux OSes.
SSMS 21 recently went into public preview which introduces 64-bit support, git integration and also many will be pleased to know now includes a dark theme.
VS Code with mssql Extension
VS Code is another Electron based tool with a bustling array of extensions available from the marketplace for not just SQL Server but also possibly every other programming language out there.
Microsoft recommends the mssql extension as the most direct way of transitioning from ADS. It should be noted that the extension apparently not provide feature parity with Azure Data Studio yet; quite a number of features are marked as preview such as Table Designer and Query Plan Visualiser.
Unlike SSMS, VS Code is cross platform and will run on Windows, Mac OS and Linux operating systems.
Like always managing SQL Server can be a challenge if your team aren’t up to date with the various developments in the products and tools available to them. That’s where we, Digital Incite and Matter Ltd, can step in to help you out with your data platform challenges. Get in touch with us today to discuss your needs further.
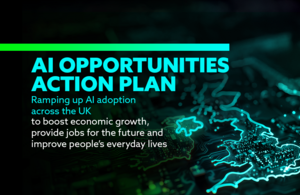
By now you’ve probably seen or read Sir Keir Starmer’s speech on the Government of the United Kingdom’s AI Opportunities Action Plan.
We’re excited as many are with the potential that AI can bring. In the Prime Minister’s speech his opening remarks were on the diagnosis of a stroke patient who’s blood clot was identified in three minutes using AI. It’s a fine example of how AI can be used to make excellent, meaningful analysis of data quickly and accurately with the overall effect on improving human life.
As with any technological development though we do feel that it’s only appropriate to consider what issues may arise. For example AI systems can be used to generate false or misleading media, harbour biases against certain population demographics that impact quality of life, and not to mention the increasing power draw that these systems require just for the computational power required.
We welcome a slower and more considered approach to AI whilst balancing against ethical considerations. Whilst we agree that AI has huge potential for society and that the UK should strive to be at the forefront of the technological revolution we are also very much aware that it may bring terrible consequences if not handled with ethics in mind. The AI Safety Institute’s safety tests will undoubtedly be closely monitored in the ongoing effort to ensure the considered development of AI technology.
With the announcement also came commitments to relaxing planning permissions to build new data centres in “AI Growth Zones” and support STEM subjects in the education system. Again, we welcome such moves in support of the UK’s IT industry.
As a company Digital Incite and Matter Ltd will be closely following new announcements and developments with AI. For our consultants it forms a core aspect of CPD activities in view of augmenting skills in a variety of sought after IT capabilities. Whether this be for making your organisation’s data available for analysis or further deployment of IT infrastructure we’re here to help as always so do get in touch to discuss your requirements.
What do you feel about the speech? Please let us know in the comments. We’d love to hear from you.
It’s very much the case that many organisations rely on a single SQL Server instance to host mission critical ERP, CRM, finance and stock control systems. In the event of a serious issue with your SQL Server instance your organisation will face a system down incident potentially on a mission critical production system.
In SQL Server there are a number of options for disaster recovery and high availability should the worst happen. AlwaysOn is a term used by Microsoft to refer to a number of options for deploying a highly available SQL Server solutions resilient to single points of failure.
You should check with application vendor(s) to confirm support of AlwaysOn technologies. This isn’t just a technological question but also competency from their implementation and support teams too. If you are in the process of or considering a fresh deployment of an application – for example if you are upgrading to the latest version alongside new infrastructure – you should definitely consider including AlwaysOn as part of the solution requirements.
Prior to the introduction of AlwaysOn DBAs would consider using Log Shipping and Database Mirroring however these have now been deprecated in favour of AlwaysOn. If you are using Log Shipping and/or Mirroring for a current deployment use AlwaysOn for any future deployments.
Broadly speaking there are two AlwaysOn methods by which high-availability can be implemented. Both technologies rely on Windows Server Failover Clustering feature to be configured. AlwaysOn options are:
AlwaysOn Availability Groups (AG) provide database level failover and secondary reads for availability databases that are members of an availability group.
If you are using SQL Server Standard Edition the AlwaysOn feature is known as Basic Availability Groups (BAG) and will be limited to two members of which the secondary is read-only.
AlwaysOn Failover ClusteringInstances (FCI) as the name implies provides instance level redundancy via active or passive nodes and as such relies on using a shared storage medium such as a shared disk or SAN.
There are advantages and disadvantages to both AlwaysOn methods. Ongoing maintenance from a DBA is necessary to manage the deployment and monitor performance.
Conclusion
In this post we’ve discussed why your organisation should consider adding high-availability options into your Microsoft SQL Server based solution and briefly mentioned the two key methods of achieving such resilience.
If you organisation needs support for AlwaysOn technologies for SQL Server or disaster recovery following an incident Digital Incite and Matter Ltd are here to help you. Please get in touch with us today to discuss your requirements.
We hope you’ve all had a wonderful Christmas and a happy new year. At Digital Incite and Matter Ltd we’re back for 2025 and ready to take on some fresh challenges.
Some of the IT trends we’re predicting and will be discussing in 2025:
The Role of Generative AI
Nobody can escape the discussion on the role that generative AI is playing out in the workplace. We may still not have the golden goal of general AI but generative AI has done enough to transform society already. Whilst we’re proud to say that all our blog posts to date are all human written we also need to be prepared for a future where AI can do significant things in place of a human.
There are a number of environmental and social issues to deal with here. We’re concerned about over-dependence on such technologies and the massive amounts of energy and hardware needed to make it work. We’re also looking closely about the impact generative AI may have on our society. It’ll be very difficult or even impossible to tell an AI generated story, image or even a video apart from a human made one very soon. With our social and democratic systems already tested to their limits we’ll be paying close attention to generative AI’s impact to balance massive potential with unforeseen dangers.
Who’s Prem is it Anyway?
We’ve noticed a trend whereby cloud contracts signed during the pandemic are being reviewed and considerable issues found with skyrocketing costs and under-delivered services. Frequently we are hearing about workloads being “repatriated” back to a private datacentre with significant cost savings, more reliable service and no issues with vendor lock-ins.
In 2025 we’ll be undoubtedly working with clients that will be carefully considering their choice of datacentre. To keep on premise, move to co-location or re-architect for cloud? Our goal for 2025 will be to make sure we help clients reach the right choice that balances security, environmental and cost efficiency whilst never compromising on data availability.
Continuing Full Fibre and 5G Rollout
It’s hard to believe it’s been around 25 years since BT first launched their “Openworld” ADSL service in the UK. Available to around 30% of UK households when initially launched for £39.99 per month way back in the year 2000. Inflation wise we think that would be around £74 per month in 2024! Subscribers could look forward to a 512 kbps download speed with 256 kbps upload. Often described as a whopping 10 times faster than the pinnacle that was 56k dial-up. Not to mention you didn’t clog the phone up when surfing the net.
25 years later and the market for broadband is now significantly different. Technologies such as XGS-PON that enable speeds of up to 10Gbps not just for businesses but also for households were unthinkable back at the turn of the millennium. Meanwhile mobile operators have been busy building 5G networks that enable low latency internet access of speeds nearing the gigabit mark.
We’re excited to see the applications of both “full fibre” and 5G products as enablers of the future workspace. Internet connections that are faster, far more reliable and consume less energy in operation will make doing business anywhere in the world no just possible but indeed the default. Gone is the world of centralised operations. Your office is truly anywhere. We’re also excited about the green aspect of such technologies which can reduce the need for travel as well as making digital distribution even more possible.
SQL Server 2025
Last but by no means the least is SQL Server 2025. The next iteration of Microsoft’s tried and tested RDBMS solution. We’ve already covered some of the main additions and changes we can expect from SQL Server 2025 in our earlier write up.
We’re looking forward to testing SQL Server 2025 out sometime soon. Upon its release we also will be supporting the business and charitable communities out with upgrades and new builds from day one.
If you choose to remain on an earlier version of SQL Server we’re also here to help. We can offer troubleshooting, health checking and maintenance on your existing SQL Server instances too.
What Else?
Of course we’re expecting some surprises throughout the year. Technology always has the ability to bring in unexpected twists and turns. Regardless of what 2025 brings Digital Incite and Matter Ltd are here to help you and your organisation in 2025.
For a free, no-obligation initial remote consultation please contact us today to discuss your requirements.
Please also feel free to drop us some ideas, questions or even points you disagree on the above in the comments section!