In SQL Server there are a number of different features that can be used to help meet data protection policies and requirements within an organisation. Usually features such as Transparent Data Encryption (TDE) are widely employed to secure data but this doesn’t necessarily protect against accidental disclosure from persons and applications that might have a user within the database. One such feature that I’ve recently been working with is Dynamic Data Masking or DDM.
What is Dynamic Data Masking (DDM) and Why Should I Use It?
Dynamic Data Masking (DDM) was introduced in SQL Server 2016 (also in Azure SQL Database) and is a method to mask sensitive data from disclosure to non-privileged users. A masking function is applied to the data at column level using a DDL (Data Definition Language) statement.
This can be useful to allow a user the ability to select the row from the table in order to be able to design a query or report but then hand the responsibility for running the object back to a privileged user. This way the user without the necessary authorisation within the organisation never sees the sensitive data by accident. Think contractors and consultants.
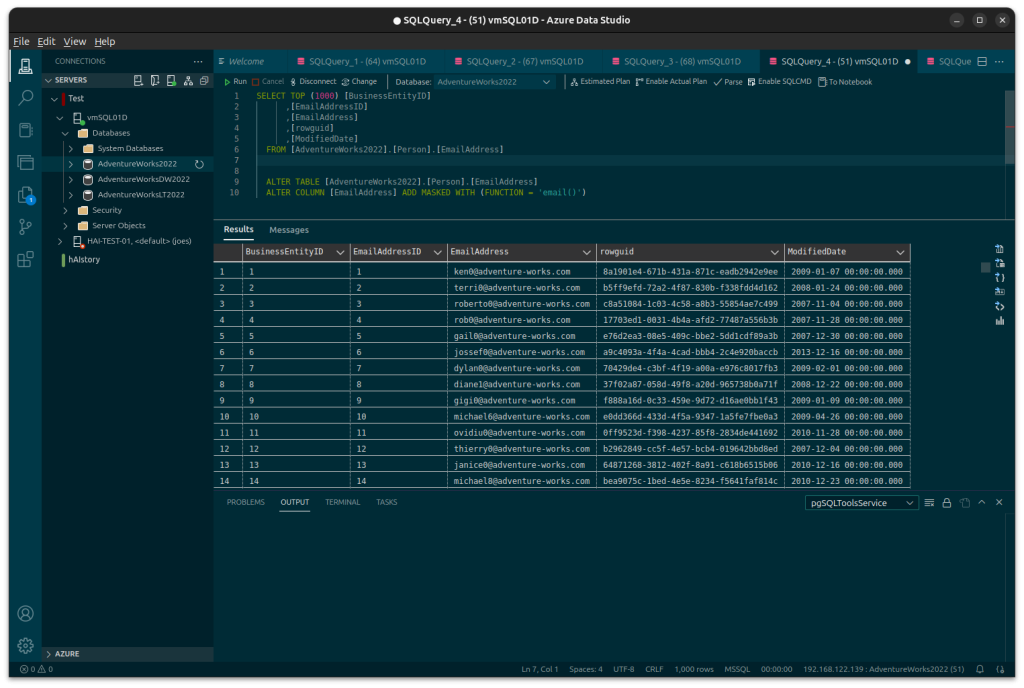
DDM is applied to the table schema per column. In this example I apply to an existing AdventureWorks2022 test database using the email function.
USE [AdventureWorks2022]
ALTER TABLE [Person].[EmailAddress]
ALTER COLUMN [EmailAddress] ADD MASKED WITH (FUNCTION = 'email()')
Under normal circumstances a user would be able to select out the table and see the complete email address:
As a user without the UNMASK privilege they will see:
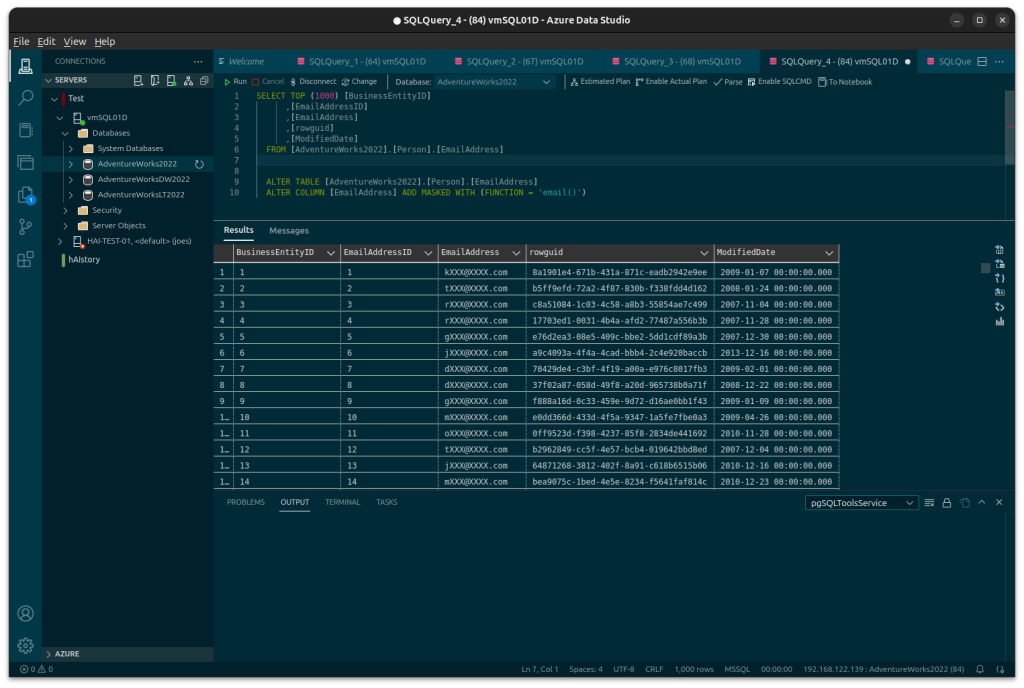
In order for a user in a database to be able to select the unmasked data from the table they must be granted the UNMASK privilege.
There are other types of function available to use and even the ability to implement custom masks as per requirements.
- Default – full data masking.
- Email – Masks the email after the first letter up to the @ and then the domain up to the suffix.
- Random – can be used on numeric types to mask the original value with a random value.
- Custom String – creates a custom masking method which exposes the first and last letter only with a padding string in the middle.
- Datetime (SQL Server 2022 and above) – allows masking segments of a date and/or time.
There are some technical limitations to DDM such as not being able to apply masks to encrypted columns or computed columns. It also doesn’t fully secure data against malicious users who may find other way around the mask.
Conclusion
Dynamic Data Masking or DDM is just one of a number of features available in Microsoft SQL Server that can be used to protect data from leak or exposure. As SQL Server consultants Digital Incite and Matter Ltd can assist with implementing such features. For assistance with DDM or anything SQL Server related get in touch with us today for an initial consultation.